
Menu
Rename
Rename
Rename
Uploading ...
Finding ...

Please enter your Account Password
Password: |
Continue
If you have forgotten your password Click Here
Choose a User Name
Please enter your Current & New Passwords
Current Password: |
|
New Password: |
|
Re-Enter New Password: |
If you have forgotten your password Click Here
Please enter your Account Password
Current Password: |
|
New Password: |
|
Re-Enter New Password: |
Continue
If you have forgotten your password Click Here
Log In to your SDK Account
Log In with your email address.
Log In with Email
Create an SDK Account
Sign up with your email address.
Sign up with Email
Your Email |
|
Message |
Name: |
|
Package/Bundle Id: |
Cancel
Save
Cloud Name: |
|
Packages/Bundle Ids: |
|
|
+ -
|
The Vternal Framework (VF) is an Software Development Kit (SDK) library which you can include in your Android or iOS Application. It enables unused storage on devices running your app to be used as a cloud.
The Vternal Framework is built to run on top of the unreliable Internet, but it's secure, fast and reliable. Your app may be uninstalled, may come and go regularly, or it may throw away Vternal Data because the space is needed; but this isn’t a problem. The VF handles everything.
Typically a mobile device has over 30Gb of unused storage. The total amount of storage in your Cloud scales with the number of copies of your app that are installed, so its total size can be enormous.
Each Cloud has a key (somewhat like a Google API Key), that directs requests to/from its devices. All your app needs to do is register with your key the first time it opens. Everything else is automatic and behind the scenes. Your users need not see any changes in your app unless you want them to.
Individual apps can be combined into a single cloud. For example, you may have iOS and Android versions of your app combined into a single cloud.
To store or fetch data from your cloud you use our REST api
The steps involved in 'vternalizing' your application are as follows:
Each Cloud is identified by a Unique Name & Key and a set of Package Names (Android) or Bundle Ids (iOS) which belong to the applications which use that Cloud. An application can only be a member of one Cloud. When an app 'registers' with Vternal it passes its Cloud Key and its Package Name or Bundle Id to Vternal. Only if these match will a device be registered.
You must be signed up and logged in to this SDK to create a Cloud.
We provide you with useful statistics about your Clouds. How many apps are in your Cloud? How much unused storage does your Cloud have? How many files have been stored in your Cloud, and how much storage does this represent?
Before you can use the VF in your applications the Vternal Framework code needs to be downloaded for the platform(s) you're interested in.
On Android you download vternalframework.aar, on iOS you download vternalframework.zip. The framework is very small (typically < 30k on Android and about 150k on iOS/arm64 ) and therefore it should not adversely affect the size of your app download.
You must be signed up and logged in to this SDK to perform these downloads.
Depending on whether your app is for Android or iOS you need to do things differently, but the goal is the same: to copy the Vternal Framework into the right place and to enable it in your Application. Once you have done this you can call the VF Api within your Application.
The snippets below show you how to incorporate the VF into your app.
The first step is to copy the downloaded vternalframework.aar into your Android App's app folder. Typically you use Terminal (on the Mac) or the equivalent on Windows to do this. As an example here is how you might do it on the Mac (assuming your current directory is the HOME folder of your app):
Then you need to make the following changes to the file app:bundle.gradle:
The first implementation line ensures that your app is loading the code for WorkerService. You may not need this line if you are already using this module in your app. The second line includes vternalframework.aar in your app. You will need this line.
Note: You must be set minSdk in your app to 28 or higher in your app:bundle.gradle file. Note also that if the VF aar is in the wrong place Android Studio may give you some weird error messages. Make sure vternalframework.aar is in the root of your app folder.
Your app must be built for iOS 14.0 or higher and devices must use an arm64 processor. You can build your app to run on both the simulator and real devices, but the VternalFramework only does something (apart from starting up) on real devices. This is due to Xcode restrictions which may be relaxed in the future. So you can build with the VF on the simulator, but to see anything happen in your cloud (see above) you must deploy real devices.
There are four steps: unzip the framework; add it to your app; set your app's capabilities; and, add some entries in your app's info.plist.
If you are using Swift it is necessary to create or edit a Bridging Header file so that you can call our framework from your Swift program.
The first step is to unzip the downloaded vternalframework.zip file, creating a folder vternalframework.xcframework. Create this folder in a convenient place. Typically you use Terminal (on the Mac) or the equivalent on Windows to do this. As an example here is how you might do it on the Mac:
Next you incorporate this framework file into your app within Xcode. In Xcode, with your app open, navigate to the 'General' tab of your target and scroll down until you find the section 'Frameworks, Libraries and Embedded Content'. Then add the vternal framework. To do this click the '+' sign but then click on the dropdown at bottom left of the dialog that appears: 'Add Other...'.

Select the 'Add Files' on this dropdown and navigate to the vternalframework.xcframework folder you just unzipped. Select this folder and it will appear in the list of used frameworks as vternalframework.xcframework.
It should look something like this:

Make sure it says 'Embed & Sign' next to the framework. If not, set it.
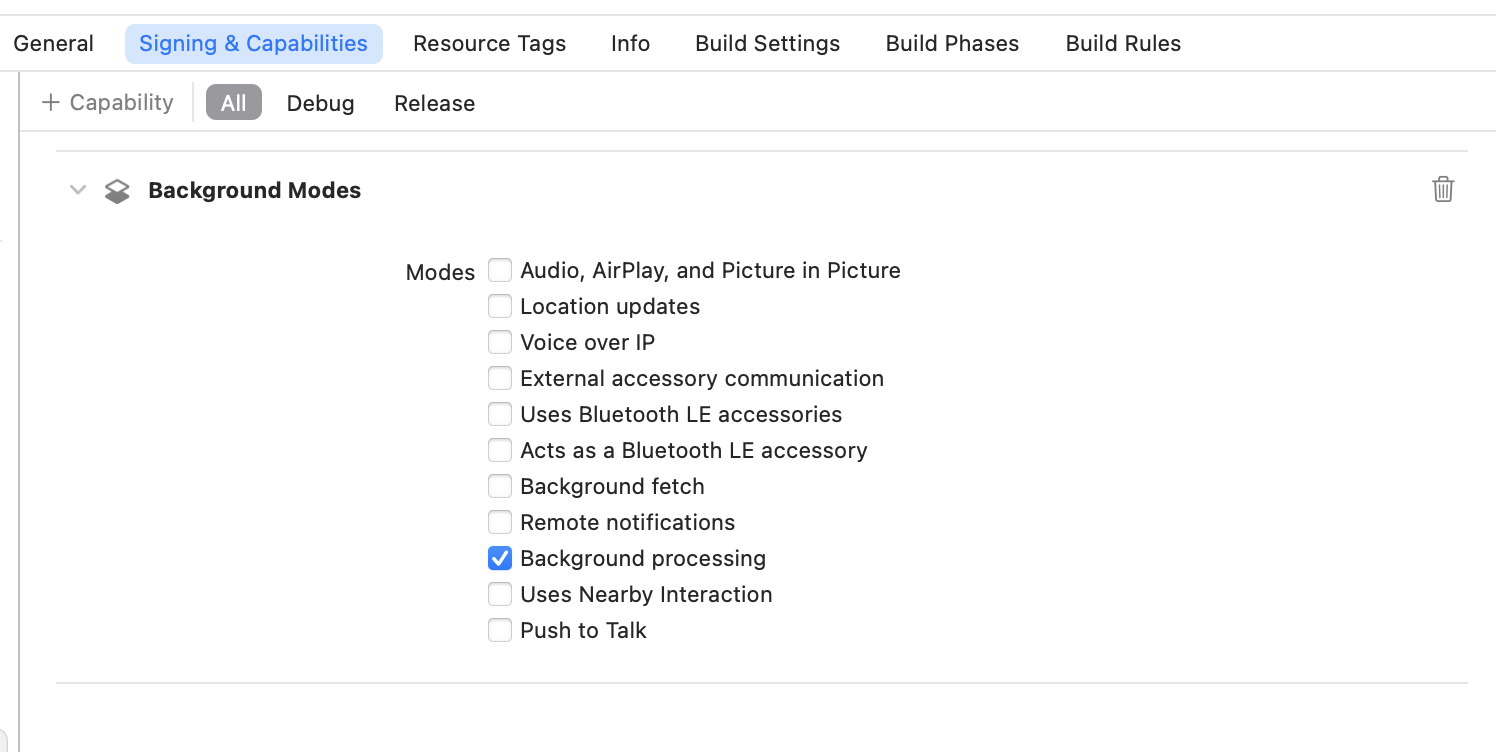
Now you set (or confirm) the capabilities of your app. If you are already using BackgroundTasks.framework you will be familiar with this step and you may only need to add the identifier 'com.vternal.ios.conjugate'. Navigate to the 'Signing & Capabilities' tab of your target. Use the '+ Capability' button at top left and add the capability 'Background Modes'. Then set the capability 'Background processing', thus:
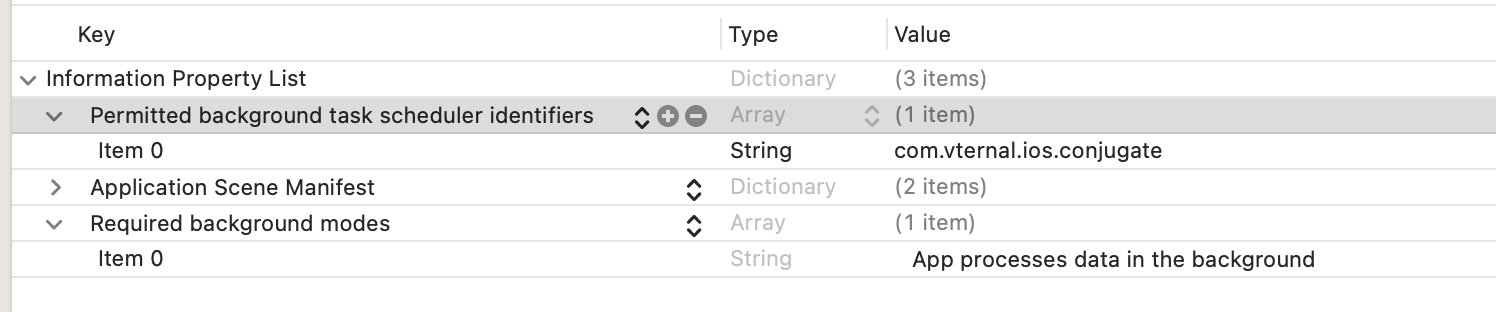
The final thing that needs to be setup is to add the key Permitted background task scheduler identifiers to info.plist.
Navigate to your app's info.plist file and open it: add the key; and, then add 'com.vternal.ios.conjugate' to the array. This identifier allows the Vternal Framework to schedule background tasks, thus:
When you have completed these four steps you are ready to initialize the Vternal Framework in your app.
The primary purpose of calling the vternalframework api is to register your application instance with Vternal. You call the register api during startup of your app. On Android you typically place your register call in the 'onCreate' method of your app's startup method. On iOS you typically make the call to 'registerWithKey in the 'didFinishLaunchingWithOptions' method of your appDelegate. If you're using the latest Swift api on iOS, then you need to put the call to 'register in your 'init' method. In every case, dependent on your preferred programming language, you call register or registerWithKey. Note that the register and registerWithKey calls are asynchronous and optional callbacks are used to monitor its success if required.
The register or registerWithKey calls make your app instance a part of your Cloud. You needn't do anything else. Everything else happens in the background and the VF (once registered) takes care of everything. Nothing could be simpler, with one call you're up and running. Vternal doesn't waste your battery; everything is under control of the underlying OS.
if you're already doing background processing Vternal won't interfere with that. The added burden imposed by Vternal is minimal.
If your primary (startup) Activity is written in Java the register call takes three parameters: your startup activity; your Cloud key; and, an optional callback (using the vternalInitialiser interface) to monitor the registration process. So, the simplest way to register is as follows:
or you can include a callback,
Calling Java (in which the Vternal Framework for Android is implemented) is very straightforward from Kotlin. Lambdas (functions with no name) are used to connect Kotlin code to the vternalInitializer Java interface. So, the simplest way to register a Kotlin app is as follows:
or you can include a callback,
It is important to understand that the register call on Android simply enables your device to be part of a Vternal Cloud. Storing and Fetching data from the Cloud is done using the REST Api (or wrappers). See The REST Api for details about how to use it.
You must pass an Activity Object to the register call which has the same package name (this.getPackageName()) as was used to register your Cloud. Otherwise registration will fail. This is different from iOS where the Bundle Id is inherent in the application. For a list of other calls you can make see the API Reference.
If your App Startup is written in Objective-C; then the register call takes only two parameters: your Cloud key (see above); and, an optional callback to monitor the registration process. So, the simplest way to register is as follows:
or you can include a callback,
Apple is moving away from Objective-C to Swift. Therefore many iOS applications are written in that language. Apple requires you to have a so-called Bridging Header to call Objective-C from Swift. Unfortunately the Vternal Framework for iOS is written in Objective-C, so, if you're writing in Swift, you'll need one on these. To create a Bridging Header, if you don't already have one, means creating a place holder Objective-C file (using 'New File' and selecting '.m'/Objective-C. when prompted). Then Xcode will ask you if you want to create a Bridging Header. Choose this option. Then the Bridging Header should be created and you can delete the .m file. add the following line to your Bridging Header. If you already have a Bridging Header, just add this line somewhere.
Now add the following to your startup code (this assumes you are using SwiftUI and your application conforms to the App protocol):
or you can include a callback,
It is important to understand that the registerWithKey (Objective-C), or register (Swift) calls on iOS simply enable your device to be part of a Vternal Cloud. Storing and Fetching data from the Cloud is done using the REST Api. See The REST Api for details about how to use it.
On iOS the Bundle Id is inherent in your application, so there is no need to include it as a parameter to registerWithKey or register. However, if your app has the wrong Bundle Id (not in your Cloud spec. See Above), registration will fail.
Note also that the call to registerWithKey or register must be during the initialization of your app. Any other use on a real device will cause an exception because the framework schedules background tasks and this must be done during initialization.
You've created a Cloud, coded your app to register itself and deployed it on devices. Now you use our REST Api to store, fetch and delete objects (files) in that Cloud. You can do this on any platform: in your app; on your backend server; etc., as you please. Typically you wrap our api in code in the language of your choice. To use our api you chose the right HTTPS endpoint for the function you want to call, set up the parameters to that call, and perform an HTTP POST.
We use JSON (see json.org for details) to send parameters to our api and you receive a JSON object in response. This JSON response contains the results you are looking for, or an error. In the examples below we show you how to prepare and use our apis using the 'curl' command on Linux, but, as stated above, you can marshall the parameters to your call in any programming language you want. Most platforms make this easy. For example, you might use the HttpURLConnection class on Android, on iOS you might use the NSURLSession classes. In most cases the call to our api is asynchronous, but this is up to you.
To store a file you need: the file (or data read from it); and, the Key to the Cloud where you want to store it. when you use our api you are returned a Vternal Asset Key (vkey, see below) which you can use later to fetch and manipulate the stored file. The URL endpoint for storing data is 'https://framework.vternal.com/rest/store'. The 'store' operation uses two HTTP sections: one to encode the parameters in JSON and one to encode the file to be stored.
The Key to the destination Cloud you encode in an HTTP section called 'params', as follows: '{ "akey" : "<YOUR CLOUD KEY>" }'. This HTTP section has type 'application/json'. This HTTP section is in JSON format.
The parameter HTTP section is followed by an HTTP section which encodes the file. That HTTP section is typically of type 'application/octet-stream', but it need not be.
If everything goes well you recieve a JSON packet which encodes a 'Vternal Asset Key' (vkey). You can use later key to fetch or manipulate the file you have stored. A typical successful response looks like this '{ "status" : "ok", "vkey" : "<VTERNAL ASSET KEY>" }'. Note that the 'status' field is set to 'ok" indicating a successful request. If the store fails it is reflected in the returned JSON packet which has the 'status' field set to 'error" and returns an error message, As follows: '{ "status" : "error", "message" : "<ERROR MESSAGE>" }' The message tells you something about what went wrong.
A Linux Curl command might look like this:
When a file is stored, it is first uploaded to Vternal, then compressed, encrypted and sharded. From there it finds it's way into the specified Cloud and a 'Vternal Asset Key' is generated. Every Cloud has it's own encryption key and that key is heavily guarded (it is only known by Vternal and never sent on the Internet). No data is stored in your Cloud unless it's encrypted. This should give you and your users peace of mind, becuase no data in your Cloud can be decrypted, re-assembled from shards into files and read. It is only within Vternal that data is encrypted and decrypted. Furthermore, no data is identified by its file name. It's up to you to map the 'Vternal Asset Key' onto filenames, as you wish. Unencrypted data is only transferred to you as the result of a fetch operation (see below) and even then the data might be encrypted with a key only you know.
Fetching data proceeds in two steps: in the first you use your Vternal Asset Key (vkey) to retrieve a URL for your data; in the second step you download the data from the given URL. The URL endpoint for fetching a data URL is 'https://framework.vternal.com/rest/fetch'. The 'fetch' operation uses only one HTTP section to encode the parameters of the item to fetch, in JSON.
The Key to your Cloud, plus your files 'vkey' are encoded in 'params', as follows: '{ "akey" : "<YOUR CLOUD KEY>", "vkey" : "<VTERNAL ASSET KEY>" }'. A successful result returns a URL which can be used to fetch the actual data. As follows: '{ "status" : "ok", "url" : "<VTERNAL ASSET URL>" }'.
A Linux Curl command to achieve this, might look like this:
The URL returned by 'fetch' is typically like: 'https://framework.vternal.com/cache/<KEY>'. The KEY is formed as follows: a SHA-256 hash of the data to be retrieved (producing DATA HASH) is concatenated with the CLOUD KEY and the VTERNAL ASSET KEY of the data, and the KEY is produced as the SHA-256 hash of all this (the order is CLOUD KEY, VTERNAL ASSET KEY, DATA HASH). Therefore the KEY is unique, cannot be guessed, and can be used to validate the data if desired.
A Linux Curl command to download a <VTERNAL ASSET URL> might look like this:
To validate downloaded data, proceed as follows: hash the downloaded data (producing DATA HASH); concatenate this with CLOUD KEY and VTERNAL ASSET KEY (the order is CLOUD KEY, VTERNAL ASSET KEY, DATA HASH); then hash all this. This hash should give you KEY, if it doesn't something is wrong. The hash algorithm is, of course, SHA-256.
Deleting data is very simple. The URL endpoint for deleting a data URL is 'https://framework.vternal.com/rest/delete'. The 'delete' operation uses only one HTTP section to encode the parameters of the item to delete, in JSON. The parameters to this call are exactly the same as for fetch. The Key to your Cloud, plus your file's 'vkey' are encoded in 'params', as follows: '{ "akey" : "<YOUR CLOUD KEY>", "vkey" : "<VTERNAL ASSET KEY>" }'. A successful result is very simple. As follows: '( "status" : "ok" }'.
A Linux Curl command to achieve this, might look like this:
Behind the scenes all copies of the file are expunged. Attempts to fetch the file will fail.
It is very useful to know the status of your Cloud. The stats api does this for a given Cloud. The URL endpoint for getting the stats on a Cloud is 'https://framework.vternal.com/rest/stats'. The 'stats' operation uses only one HTTP section to encode the Cloud Key, in JSON. The parameters to this call are exactly the same as for store. The Key to your Cloud is encoded in 'params', as follows: '{ "akey" : "<YOUR CLOUD KEY>" }'. A successful result is as follows: '{ "status" : "ok", "akey" : "<CLOUD KEY>", "free" : <FREE STORAGE IN Gb>, "used" : <USED STORAGE IN Gb>, "nc" : <NUMBER OF DEVICES CONNECTING IN LAST 24 HOURS>, "fu" : <FRACTION OF FREE STORAGE USED>, "gbpd" : <Gb OF STORAGE PER DEVICE> }'.
A Linux Curl command to achieve this, might look like this:
From these statistics many things may be calculated.
Review and make changes to your Account Settings here.
Handle: |
|
Description: |
|
Valid Email Address: |
Click Here to change your password
Click Here to choose a New Profile Image |
View our Terms & Conditions
You have no Items Stored
Tutorial
Introduction and Overview
Creating a Cloud Key
Downloading the Vternal Framework
Preparing your App
Android
iOS
Coding your App
Android-Java
Android-Kotlin
iOS-Objective C
iOS-Swift
Manage Cloud Keys
API Reference
The REST Api
Click on the Key Icon to create a new Cloud
The Vternal Framework (VF) is a library or framework which you can include in your Android or iOS Application. It enables unused storage on devices running your app to be used as a cloud.
The Vternal Framework is built to run on top of the unreliable Internet, but it's secure, fast and reliable. Your app may be uninstalled, may come and go regularly, or it may throw away Vternal Data because the space is needed; but this isn’t a problem. The VF handles everything.
Typically a mobile device has over 30Gb of unused storage. The total amount of storage in your Cloud scales with the number of copies of your app that are installed, so its total size can be enormous.
Each Cloud has a key (somewhat like a Google API Key), that directs requests to/from its devices. All your app needs to do is register with your key the first time it opens. Everything else is automatic and behind the scenes.
Individual apps can be combined into a single cloud. For example, you may have iOS and Android versions of your app combined into a single cloud.
To store or fetch data from your cloud you use our REST api (see below left).
The steps involved in 'vternalizing' your application are as follows:
Each Cloud is identified by a Unique Name & Key and a set of Package Names (Android) or Bundle Ids (iOS) which belong to the applications which use that Cloud. An application can only be a member of one Cloud. When an app 'registers' with Vternal it passes the Cloud Key and its Package Name or Bundle Id to Vternal. Only if these match will a device be registered (see below).
All work with Clouds is handled under the 'Manage Cloud Keys' tab (see left). Under this tab you can create, edit, and delete your Clouds.
The tab also provides you with useful statistics about your Clouds. How many apps are in your Cloud? How much unused storage does your Cloud have? How many files have been stored in your Cloud, and how much storage does this represent?
You need a Cloud Key before you can get started using Vternal. Click Here to Create a Cloud
Before you can use the VF in your applications the Vternal Framework code needs to be downloaded for the platform(s) you're interested in.
On Android you download vternalframework.aar, on iOS you download vternalframework.zip. The framework is very small (typically < 30k on Android and about 150k on iOS/arm64 ) and therefore it should not adversely affect the size of your app download.
Below, under 'Preparing your App', we explain how to incorporate these libraries into your app. Download the VF for Android Download the VF for iOS
Depending on whether your app is for Android or iOS you need to do things differently, but the goal is the same: to copy the Vternal Framework aar or framework into the right place and to enable it in your Application. Once you have done this you can call the VF Api within your Application (see below).
The snippets below show you how to incorporate the VF into your app.
The first step is to copy the downloaded vternalframework.aar into your Android App's app folder. Typically you use Terminal (on the Mac) or the equivalent on Windows to do this. As an example here is how you might do it on the Mac (assuming your current directory is the HOME folder of your app):
Then you need to make the following changes to the file app:bundle.gradle:
The first implementation line ensures that your app is loading the code for WorkerService. You may not need this line if you are already using this module in your app. The second line includes vternalframework.aar in your app. You will need this line.
Note: You must be set minSdk in your app to 28 or higher in your app:bundle.gradle file. Note also that if the VF aar is in the wrong place Android Studio may give you some weird error messages. Make sure vternalframework.aar is in the root of your app folder.
Now you are ready to use the VF Api in your application (see below).
Your app must be built for iOS 14.0 or higher and devices must use an arm64 processor. You can build your app to run on both the simulator and real devices, but the VternalFramework only does something (apart from starting up) on real devices. This is due to Xcode restrictions which may be relaxed in the future. So you can build with the VF on the simulator, but to see anything happen in your cloud (see above) you must deploy real devices.
There are four steps: unzip the framework; add it to your app; set your app's capabilities; and, add some entries in your app's info.plist.
If you are using Swift it is necessary to create or edit a Bridging Header file so that you can call our framework from your Swift program.
The first step is to unzip the downloaded vternalframework.zip file, creating a folder vternalframework.xcframework. Create this folder in a convenient place. Typically you use Terminal (on the Mac) or the equivalent on Windows to do this. As an example here is how you might do it on the Mac:
Next you incorporate this framework file into your app within Xcode. In Xcode, with your app open, navigate to the 'General' tab of your target and scroll down until you find the section 'Frameworks, Libraries and Embedded Content'. Then add the vternal framework. To do this click the '+' sign but then click on the dropdown at bottom left of the dialog that appears: 'Add Other...'.
Select the 'Add Files' on this dropdown and navigate to the vternalframework.xcframework folder you just unzipped. Select this folder and it will appear in the list of used frameworks as vternalframework.xcframework.
It should look something like this:
Make sure it says 'Embed & Sign' next to the framework. If not, set it.
Now you set (or confirm) the capabilities of your app. If you are already using BackgroundTasks.framework you will be familiar with this step and you may only need to add the identifier 'com.vternal.ios.conjugate'. Navigate to the 'Signing & Capabilities' tab of your target. Use the '+ Capability' button at top left and add the capability 'Background Modes'. Then set the capability 'Background processing', thus:
The final thing that needs to be setup is to add the key Permitted background task scheduler identifiers to info.plist.
Navigate to your app's info.plist file and open it: add the key; and, then add 'com.vternal.ios.conjugate' to the array. This identifier allows the Vternal Framework to schedule background tasks, thus:
When you have completed these four steps you are ready to initialize the Vternal Framework in your app.
The primary purpose of calling the vternalframework api is to register your application instance with Vternal. You call the register api during startup of your app. On Android you typically place your register call in the 'onCreate' method of your app's startup method. On iOS you typically make the call to 'registerWithKey in the 'didFinishLaunchingWithOptions' method of your appDelegate. If you're using the latest Swift api on iOS, then you need to put the call to 'register in your 'init' method. In every case, dependent on your preferred programming language, you call register or registerWithKey. Note that the register and registerWithKey calls are asynchronous and optional callbacks are used to monitor its success if required.
The register or registerWithKey calls make your app instance a part of your Cloud. You needn't do anything else. Everything else happens in the background and the VF (once registered) takes care of everything. Nothing could be simpler, with one call you're up and running. Vternal doesn't waste your battery; everything is under control of the underlying OS.
if you're already doing background processing Vternal won't interfere with that. The added burden imposed by Vternal is minimal.
To store or fetch data from your Cloud you use the REST api (see below).
If your primary (startup) Activity is written in Java the register call takes three parameters: your startup activity; your Cloud key (see above); and, an optional callback (using the vternalInitialiser interface) to monitor the registration process. So, the simplest way to register is as follows:
or you can include a callback,
Calling Java (in which the Vternal Framework for Android is implemented) is very straightforward from Kotlin. Lambdas (functions with no name) are used to connect Kotlin code to the vternalInitializer Java interface. So, the simplest way to register a Kotlin app is as follows:
or you can include a callback,
It is important to understand that the register call on Android simply enables your device to be part of a Vternal Cloud. Storing and Fetching data from the Cloud is done using the REST Api (or wrappers). See The REST Api for details about how to use it.
You must pass an Activity Object to the register call which has the same package name (this.getPackageName()) as was used to register your Cloud. Otherwise registration will fail. This is different from iOS where the Bundle Id is inherent in the application. For a list of other calls you can make see the API Reference.
If your App Startup is written in Objective-C; then the register call takes only two parameters: your Cloud key (see above); and, an optional callback to monitor the registration process. So, the simplest way to register is as follows:
or you can include a callback,
Apple is moving away from Objective-C to Swift. Therefore many iOS applications are written in that language. Apple requires you to have a so-called Bridging Header to call Objective-C from Swift. Unfortunately the Vternal Framework for iOS is written in Objective-C, so, if you're writing in Swift, you'll need one on these. To create a Bridging Header, if you don't already have one, means creating a place holder Objective-C file (using 'New File' and selecting '.m'/Objective-C. when prompted). Then Xcode will ask you if you want to create a Bridging Header. Choose this option. Then the Bridging Header should be created and you can delete the .m file. add the following line to your Bridging Header. If you already have a Bridging Header, just add this line somewhere.
Now add the following to your startup code (this assumes you are using SwiftUI and your application conforms to the App protocol):
or you can include a callback,
It is important to understand that the registerWithKey (Objective-C), or register (Swift) calls on iOS simply enable your device to be part of a Vternal Cloud. Storing and Fetching data from the Cloud is done using the REST Api. See The REST Api for details about how to use it.
On iOS the Bundle Id is inherent in your application, so there is no need to include it as a parameter to registerWithKey or register. However, if your app has the wrong Bundle Id (not in your Cloud spec. See above), registration will fail.
Note also that the call to registerWithKey or register must be during the initialization of your app. Any other use on a real device will cause an exception because the framework schedules background tasks and this must be done during initialization.
These section describes the Vternal Framework API in Android/Java, Android/Kotlin, iOS/Objective-C, and iOS/Swift.
| Specification |
public interface vternalInitializer {
public void done( boolean success );
}
|
| Description | The callback function ‘done’ is called following a register operation. It returns a boolean (success) which indicates if the registration was successful. Subsequently, isRegistered() returns the value of this result. |
| success | A boolean indicating whether the registration was successful or not. Success is set to 'true' if the registration was successful, 'false' otherwise. |
| Example |
...
VternalNetwork.register( this, "<YOUR CLOUD KEY>", new vternalInitializer {
done( boolean success ) {
if( success ){
...
} else {
...
}
});
...
|
| Specification |
public static void register(Activity a, String cloudKey, vternalInitializer callback);
|
| Description | Registers the calling application with Vternal. The package name and cloud key must match with this website. An optional callback (see above) enables the caller to monitor the success or failure of the registration. |
| Activity a | The calling Activity, which is usually the starting activity of the application. In any case the value of a.getPackageName() must match the cloud being registered to. |
| String cloudKey | The key for this cloud. This is obtained from this website. |
| vternalInitializer callback | An optional callback function conforming to the vternalInitializer protocol (see above). |
| Example |
import com.vternal.android.vternalframework.VternalFramework;
...
onCreate( Bundle savedInstanceState ) {
super.onCreate( savedInstanceState );
...
VternalNetwork.register( this, "<YOUR CLOUD KEY>", new vternalInitializer {
done( boolean success ) {
if( success ){
...
} else {
...
}
});
}
...
|
| Specification |
public static boolean isRegistered();
|
| Description | Returns the Registration state of this application. Returns 'true' if the app is registered, 'false' otherwise. |
| Example |
...
boolean r = VternalFramework.isRegistered();
...
|
| Specification |
fun register(a: Activity, cloudKey: String, callback: vternalInitializer) : void
|
| Description | Registers the calling application with Vternal. The package name and cloud key must match with this website. An optional callback (see above) enables the caller to monitor the success or failure of the registration. |
| a: Activity | The calling Activity, which is usually the starting activity of the application. In any case the value of a.getPackageName() must match the cloud being registered to. |
| cloudKey: String | The key for this cloud. This is obtained from this website. |
| callback: vternalInitializer | An optional callback function conforming to the vternalInitializer protocol (see above). This callback can either be null or implemented as a lambda function (see below). |
| Example |
import com.vternal.android.vternalframework.VternalFramework
...
override fun onCreate( savedInstanceState: Bundle? ) {
super.onCreate( savedInstanceState )
...
VternalNetwork.register( this, "<YOUR CLOUD KEY>" ) { success ->
if( success ){
...
} else {
...
}
}
...
}
|
| Specification |
fun isRegistered() : boolean
|
| Description | Returns the Registration state of this application. Returns 'true' if the app is registered, 'false' otherwise. |
| Example |
...
var registered = VternalFramework.isRegistered()
...
|
| Specification |
+ (void) registerWithKey:(NSString *)key callback:(void(^)(BOOL))registered;
|
| Description | Registers a Vternal Application, previously registered on the this website. Without a call to this API the VternalFramework is not activated and cannot be used. |
| key | The key for your app's Bundle Id registered on the this website, Keys are a 64 character hexadecimal string. |
| callback | An optional callback function called when the attempt at registration is complete. Returns a Boolean value which tells the caller whether the registration was successful. YES if successful, NO otherwise. |
| Example |
...
[VternalFramework registerWithKey:@"<YOUR CLOUD KEY>" callback:^(BOOL registered){
if( registered ){
...
} else {
...
}
}];
...
|
| Specification |
+ (BOOL) isRegistered;
|
| Description | Returns the Registration state of this application. Returns YES if the app is registered, NO otherwise. |
| Example |
...
BOOL registered = [VternalFramework isRegistered];
...
|
| Specification |
func register(_ withKey: String, _ callback: registered @escaping (Bool) -> Void)
|
| Description | Registers a Vternal Application, previously registered on the this website. Without a call to this API the VternalFramework is not activated and cannot be used. |
| key | The key for this cloud. This is obtained from this website. |
| callback | An optional callback function called when the attempt at registration is complete. Returns a Boolean value which tells the caller whether the registration was successful. YES if successful, NO otherwise. |
| Example |
...
VternalFramework.register( withKey: "<YOUR CLOUD KEY>", callback: {(registered: Bool) -> () in
if registered {
...
} else {
...
}
})
...
|
| Specification |
func isRegistered() -> Bool
|
| Description | Returns the Registration state of this application. Returns YES if the app is registered, NO otherwise. |
| Example |
...
let registered = VternalFramework.isRegistered()
...
|
You've created a Cloud, coded your app to register itself and deployed it on devices. Now you use our REST Api to store, fetch and delete objects (files) in that Cloud. You can do this on any platform: in your app; on your backend server; etc., as you please. Typically you wrap our api in code in the language of your choice. To use our api you chose the right HTTPS endpoint for the function you want to call, set up the parameters to that call, and perform an HTTP POST.
We use JSON (see json.org for details) to send parameters to our api and you receive a JSON object in response. This JSON response contains the results you are looking for, or an error. In the examples below we show you how to prepare and use our apis using the 'curl' command on Linux, but, as stated above, you can marshall the parameters to your call in any programming language you want. Most platforms make this easy. For example, you might use the HttpURLConnection class on Android, on iOS you might use the NSURLSession classes. In most cases the call to our api is asynchronous, but this is up to you.
To store a file you need: the file (or data read from it); and, the Key to the Cloud where you want to store it. when you use our api you are returned a Vternal Asset Key (vkey, see below) which you can use later to fetch and manipulate the stored file. The URL endpoint for storing data is 'https://framework.vternal.com/rest/store'. The 'store' operation uses two HTTP sections: one to encode the parameters in JSON and one to encode the file to be stored.
The Key to the destination Cloud you encode in an HTTP section called 'params', as follows: '{ "akey" : "<YOUR CLOUD KEY>" }'. This HTTP section has type 'application/json'. This HTTP section is in JSON format.
The parameter HTTP section is followed by an HTTP section which encodes the file. That HTTP section is typically of type 'application/octet-stream', but it need not be.
If everything goes well you recieve a JSON packet which encodes a 'Vternal Asset Key' (vkey). You can use later key to fetch or manipulate the file you have stored. A typical successful response looks like this '{ "status" : "ok", "vkey" : "<VTERNAL ASSET KEY>" }'. Note that the 'status' field is set to 'ok" indicating a successful request. If the store fails it is reflected in the returned JSON packet which has the 'status' field set to 'error" and returns an error message, As follows: '{ "status" : "error", "message" : "<ERROR MESSAGE>" }' The message tells you something about what went wrong.
A Linux Curl command might look like this:
When a file is stored, it is first uploaded to Vternal, then compressed, encrypted and sharded. From there it finds it's way into the specified Cloud and a 'Vternal Asset Key' is generated. Every Cloud has it's own encryption key and that key is heavily guarded (it is only known by Vternal and never sent on the Internet). No data is stored in your Cloud unless it's encrypted. This should give you and your users peace of mind, becuase no data in your Cloud can be decrypted, re-assembled from shards into files and read. It is only within Vternal that data is encrypted and decrypted. Furthermore, no data is identified by its file name. It's up to you to map the 'Vternal Asset Key' onto filenames, as you wish. Unencrypted data is only transferred to you as the result of a fetch operation (see below) and even then the data might be encrypted with a key only you know.
Fetching data proceeds in two steps: in the first you use your Vternal Asset Key (vkey) to retrieve a URL for your data; in the second step you download the data from the given URL. The URL endpoint for fetching a data URL is 'https://framework.vternal.com/rest/fetch'. The 'fetch' operation uses only one HTTP section to encode the parameters of the item to fetch, in JSON.
The Key to your Cloud, plus your files 'vkey' are encoded in 'params', as follows: '{ "akey" : "<YOUR CLOUD KEY>", "vkey" : "<VTERNAL ASSET KEY>" }'. A successful result returns a URL which can be used to fetch the actual data. As follows: '{ "status" : "ok", "url" : "<VTERNAL ASSET URL>" }'.
A Linux Curl command to achieve this, might look like this:
The URL returned by 'fetch' is typically like: 'https://framework.vternal.com/cache/<KEY>'. The KEY is formed as follows: a SHA-256 hash of the data to be retrieved (producing DATA HASH) is concatenated with the CLOUD KEY and the VTERNAL ASSET KEY of the data, and the KEY is produced as the SHA-256 hash of all this (the order is CLOUD KEY, VTERNAL ASSET KEY, DATA HASH). Therefore the KEY is unique, cannot be guessed, and can be used to validate the data if desired.
A Linux Curl command to download a <VTERNAL ASSET URL> might look like this:
To validate downloaded data, proceed as follows: hash the downloaded data (producing DATA HASH); concatenate this with CLOUD KEY and VTERNAL ASSET KEY (the order is CLOUD KEY, VTERNAL ASSET KEY, DATA HASH); then hash all this. This hash should give you KEY, if it doesn't something is wrong. The hash algorithm is, of course, SHA-256.
Deleting data is very simple. The URL endpoint for deleting a data URL is 'https://framework.vternal.com/rest/delete'. The 'delete' operation uses only one HTTP section to encode the parameters of the item to delete, in JSON. The parameters to this call are exactly the same as for fetch. The Key to your Cloud, plus your file's 'vkey' are encoded in 'params', as follows: '{ "akey" : "<YOUR CLOUD KEY>", "vkey" : "<VTERNAL ASSET KEY>" }'. A successful result is very simple. As follows: '( "status" : "ok" }'.
A Linux Curl command to achieve this, might look like this:
Behind the scenes all copies of the file are expunged. Attempts to fetch the file will fail.
It is very useful to know the status of your Cloud. The stats api does this for a given Cloud. The URL endpoint for getting the stats on a Cloud is 'https://framework.vternal.com/rest/stats'. The 'stats' operation uses only one HTTP section to encode the Cloud Key, in JSON. The parameters to this call are exactly the same as for store. The Key to your Cloud is encoded in 'params', as follows: '{ "akey" : "<YOUR CLOUD KEY>" }'. A successful result is as follows: '{ "status" : "ok", "akey" : "<CLOUD KEY>", "free" : <FREE STORAGE IN Gb>, "used" : <USED STORAGE IN Gb>, "nc" : <NUMBER OF DEVICES CONNECTING IN LAST 24 HOURS>, "fu" : <FRACTION OF FREE STORAGE USED>, "gbpd" : <Gb OF STORAGE PER DEVICE> }'.
A Linux Curl command to achieve this, might look like this:
From these statistics many things may be calculated.